1. Salesforce Configuration #
To enable the integration, you must configure:
- A Salesforce Site
- A Connected App (External Client App)
- Custom Settings
If your organization already has a Salesforce Site enabled, you can skip site creation — just make sure to grant public access to the class:
metrica_powerbi.OAuthProxy2. Create a Salesforce Site #
Step 1: Navigate to Sites #
Go to:
Setup → User Interface → Sites and Domains → SitesStep 2: Create a New Site #
- Click New
- Fill in the required fields (you may use any appropriate values)
- Make sure the Active checkbox is selected
- Click Save
Step 3: Enable Apex Class Access #
- Click the site label to open Site Details
- Click Public Access Settings
- Scroll to Enabled Apex Class Access
- Click Edit
- Add:
metrica_powerbi.OAuthProxy - Save

2a. Create a Connected App (Standard Path) #
Step 1: Enable Connected Apps #
Go to:
Setup → Apps → External Client Apps → SettingsEnable creating Connected Apps if not already enabled.

Click New Connected App.

Step 2: Basic Configuration #
Fill in:
- Connected App Name – any appropriate name
- Contact Email – your email address

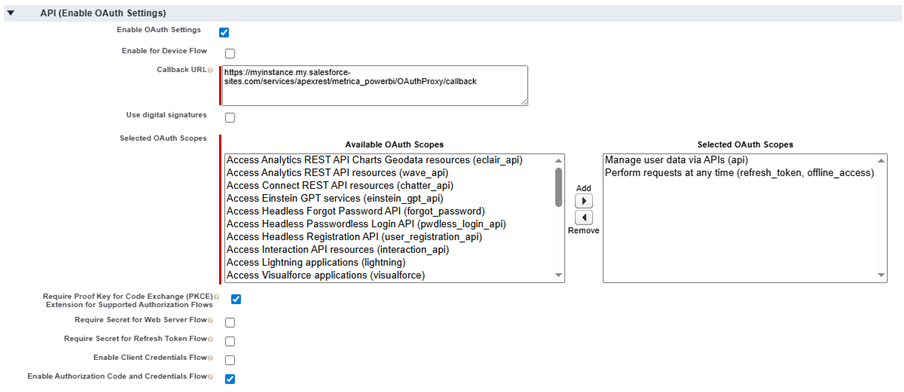
Step 3: Enable OAuth Settings #
Open the API (Enable OAuth Settings) section.
Check:
- ✅ Enable OAuth Settings
Callback URL #
Enter:
[Your Site URL]/services/apexrest/metrica_powerbi/OAuthProxy/callback(Replace [Your Site URL] with the Site URL you copied earlier.)
OAuth Scopes #
Add the following scopes:
- Manage user data via APIs (api)
- Perform requests at any time (refresh_token, offline_access)
Required Checkboxes #
Make sure the following are checked:
- ✅ Enable Authorization Code and Credentials Flow
- ✅ Require Proof Key for Code Exchange (PKCE) Extension for Supported Authorization Flows
All other checkboxes should remain unchecked.
Step 4: Copy the Consumer Key #
After saving:
- Click Manage Consumer Details
- Copy the Consumer Key
- Save it — you will need it for the next step
2b. Alternative Path: External Client App #
Step 1: Create External Client App #
Go to:
Setup → Apps → External Client Apps → External Client App ManagerClick “New External Client App” button

Step 2: Basic Configuration #
Fill in:
- External Client App Name – any appropriate name
- Contact Email – your email address

Step 3: Enable OAuth Settings #
Open the API (Enable OAuth Settings) section.
Check:
- ✅ Enable OAuth Settings
Callback URL #
Enter:
[Your Site URL]/services/apexrest/metrica_powerbi/OAuthProxy/callback(Replace [Your Site URL] with the Site URL you copied earlier.)
OAuth Scopes #
Add the following scopes:
- Manage user data via APIs (api)
- Perform requests at any time (refresh_token, offline_access)
Required Checkboxes #
Make sure the following are checked:
- ✅ Enable Authorization Code and Credentials Flow
- ✅ Require Proof Key for Code Exchange (PKCE) Extension for Supported Authorization Flows
All other checkboxes should remain unchecked.

Click “Create” button
Step 4: Copy the Consumer Key #
After saving:
- Click “Settings” tab and open “OAuth Settings” section

- Click Consumer Key and Secret

- Copy the Consumer Key
- Save it — you will need it for the next step
3. Configure Custom Settings #
Step 1: Open Custom Settings #
Go to:
Setup → Custom Code → Custom SettingsFind Power BI Key and click Manage.
Click New above the Default section.

Step 2: Enter Configuration Details #
Fill in:
Client ID #
Paste the Consumer Key you copied earlier.
Base Site URL #
Paste the Site URL you copied earlier.
Base Salesforce URL #
Paste your Salesforce instance base URL.
(This is usually the same as your site URL but without -sites.)
Example:
https://myinstance.my.salesforce.com
Step 3: Wait for Activation #
After saving the settings:
⏳ Wait approximately 10 minutes.
The Connected App needs time to activate.
4. First Authorization #
Once activation is complete:
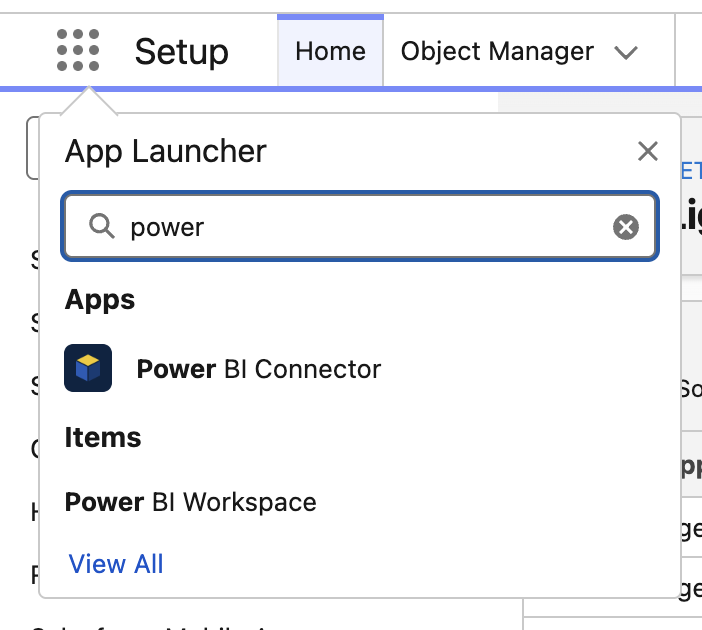
1. Open the Power BI Connector application.
2. Click Authorize with Salesforce.
3. Approve the authorization request.

Setup Complete #
You can now:
- Create your first Data Source
- Connect Power BI
- Start importing data
If you run into issues during activation, wait a few more minutes and try authorizing again.


